
Fiberglass Mesh for Microcement: Do You Need It?

Two Different Cracks, and Why the Mesh Debate Never Resolves
Microcement cracks for more than one reason, and the two reasons have different fixes. Almost every argument online collapses because it only addresses one of them.
| What cracked | Where it starts | What fixes it | Does mesh help? |
| Shrinkage and crazing | inside the coating as it cures | formulation and technique | barely |
| Movement and reflective cracking | in the substrate, below the coating | reinforcement and joint treatment | yes, this is its job |
| Structural cracking | the building itself | structural repair before any finish | no |
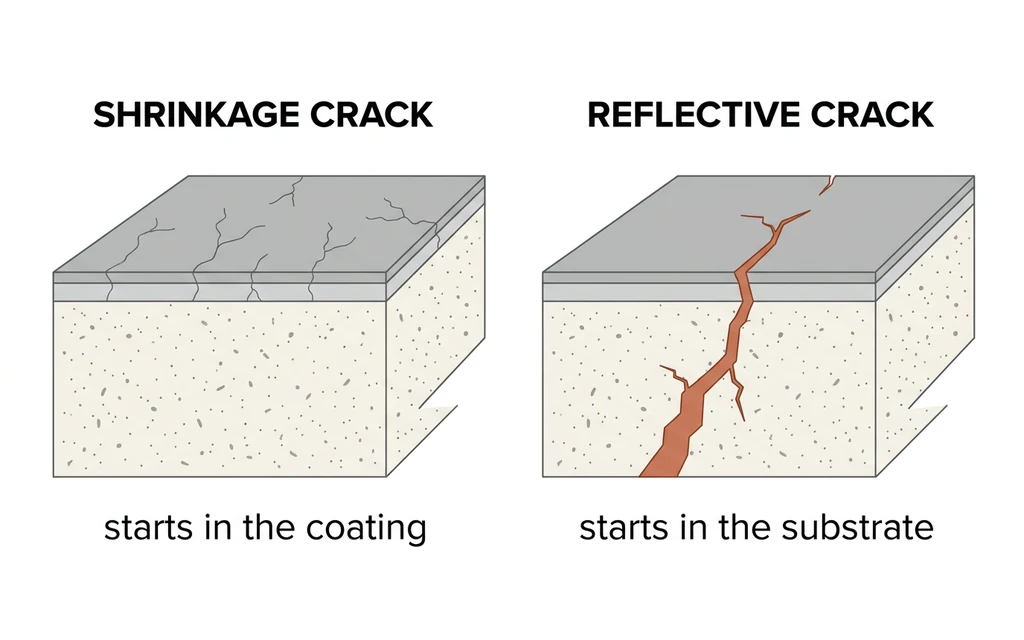
When a manufacturer of a ready-to-use, acrylic-based microcement says their product does not need mesh, their reasoning is about row one. It goes on thin, remains flexible, and shrinks far less than a traditional cement-based system. That claim is fair, and on a small rigid wall it holds.
In renovation work, row two is usually the crack that causes the biggest problems. A coating that shrinks zero still cracks when the tile beneath it moves, when a plywood panel deflects, or when two substrates expand differently across a threshold. No formulation prevents that, because the crack does not begin in the formulation. It arrives from below and the finish simply reports it.
Better chemistry can reduce cracking within the coating itself. It cannot stop movement coming from the substrate below.
What fiberglass mesh for microcement is and why it matters
Fiberglass mesh is a woven glass fabric that gets embedded into the base coat while the microcement is still wet. Once covered, it becomes part of the system rather than sitting on top of it.
Definition and materials: fiberglass, polyester, and weave types
You will see the same roll sold as fibreglass mesh, fiber mesh or reinforcement for microcement. Different spelling and trade shorthand, same product.
Fiberglass is the trade default because glass filament holds its dimension under tension. It does not stretch appreciably and does not corrode. Polyester mesh is cheaper, softer and easier to dress into a tight radius, and that extra flexibility is genuinely useful on curved detail. It also generally has lower stiffness and load-bearing performance, so fiberglass is usually the safer choice for floors and other high-traffic applications.
Weave and grammage control how the sheet behaves. A very thin mesh handles easily and reinforces poorly. A very heavy one resists being flattened into a thin base coat and leaves its pattern showing. Overlay work sits between those, which is a different sheet from heavy exterior facade mesh.
Primary functions: reinforcement, crack prevention, and adhesion bridge
The mesh helps distribute movement across a wider area instead of allowing it to concentrate along one line. Because the strands interweave in two directions, a movement that would have opened a single visible fissure is distributed across thousands of filaments and dissipates below the width your eye can pick up.
It is one of three controls in a microcement system, and confusing them is how jobs fail. Primer buys you adhesion. Mesh buys you movement tolerance. Sealer buys you water resistance. A mesh will never rescue a bond failure and it will never keep a shower dry.
Where it is commonly used: walls, floors, ceilings, and sensitive joints
Use fiberglass mesh wherever the surface underneath can move independently of the finish above it.
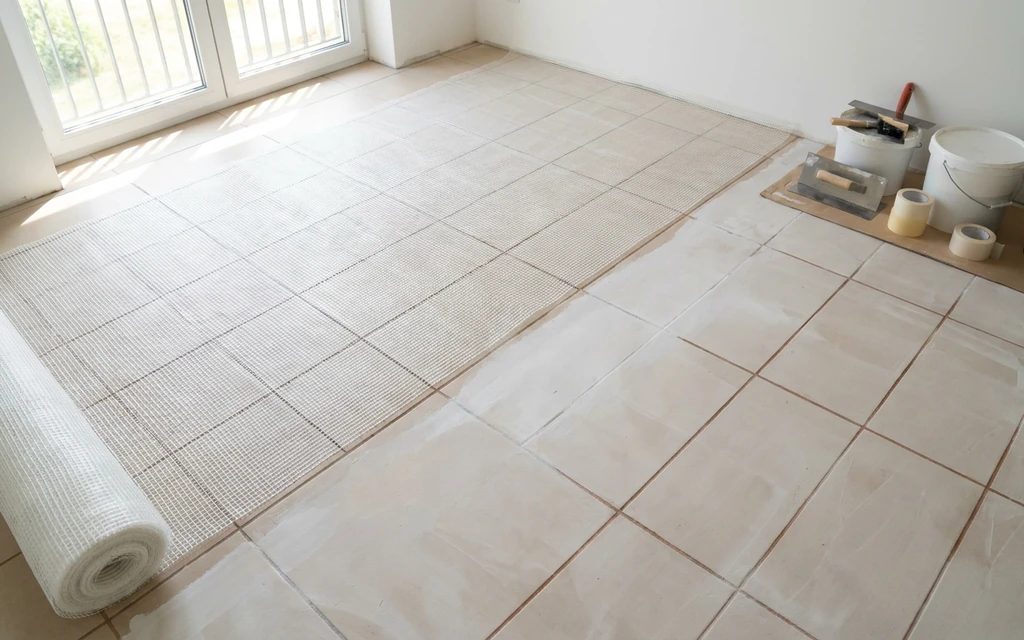
The situations below cover most of the cases where reinforcement is worth considering.
| Situation | Mesh? |
| Over existing ceramic tile, stone or terrazzo | Usually yes, full field |
| Floors, stairs, surfaces subjected to heavy traffic | Usually recommended, full field |
| Plywood, OSB, plasterboard, any panel substrate | Yes, full field |
| Ceilings, especially at wall junctions and fittings | Sí |
| Where two substrates meet | Yes, banded across the join |
| Over a repaired or dormant joint | Yes, banded over the repair |
| Over a live expansion joint | No. Carry the joint through the finish |
That last row is where good jobs still fail. A dormant saw-cut joint in a cured slab can be bridged. A joint designed to move must be carried up through the finish and treated as a joint in the final surface. Meshing over a live expansion joint does not defeat the movement, it only decides where the crack appears.
How mesh interacts with different microcement systems (ready-to-use vs. cement-based)
Cement-based systems shrink as they cure and are usually applied in coarser, thicker coats, so full-field mesh is standard. Ready-to-use acrylic systems shrink far less and go on thinner, which is why their makers can honestly say mesh is optional on stable vertical surfaces.
Neither statement tells you anything about your substrate. Read the system’s data sheet for the coating, then decide the reinforcement from the floor you are standing on.
Benefits of using fiberglass mesh with microcement
Improved structural strength and resistance to tension and impact
The important distinction is that mesh improves tensile behaviour across the sheet, not hardness.
Prevention of cracks, fissures, and damage from temperature changes or movement
Thermal cycling moves substrates, and it moves different substrates by different amounts. Underfloor heating is the clearest case, because it drives a daily expansion cycle underneath a rigid finish. Reinforcement helps distribute the stresses created by those repeated movements instead of allowing them to concentrate in one area.
Enhanced adhesion to substrates and acting as a bridge between layers
Mechanical keying happens when the base coat passes through the openings and locks both faces together. That is a real secondary benefit, but adhesion is primarily the primer’s job, matched to whether the surface is absorbent or non-absorbent.
Longer durability for surfaces exposed to heavy traffic, moisture, or chemical agents
Reinforcement extends service life by preventing the failure that cannot be repaired invisibly. A crack in a continuous finish is not a patch job. It usually means recoating the field. That is why adding mesh during installation can be far cheaper than dealing with a crack after the finished surface is complete.
When mesh may not be necessary for microcement applications
Skipping mesh is a legitimate decision. It is a decision about the sustrato, not a shortcut on labor. You can reasonably leave it out when all of the following are true:
- The substrate is rigid, monolithic and sound. One material, no panels, no joints, no movement history.
- The surface is vertical and the substrate is stable, with little risk of movement.
- The area is small and continuous, with no transitions running through it.
- The system is a genuinely thin-film formulation whose data sheet says so.
- The area is not exposed to water, or the complete system provides the required waterproofing separately.
A feature wall on sound, well-adhered plaster is the honest example. A bathroom floor over existing tile is a very different situation, even if the microcement itself is highly flexible.
How to prepare the substrate before installing fiberglass mesh
Reinforcement is never a substitute for preparation. Fix the substrate first, then reinforce it.
- Check flatness. Microcement is thin and will not correct a deviation. Level it before you start.
- Check moisture and treat it at the source. If moisture is coming through the slab, address the source first and use a compatible moisture barrier where the system requires one. Follow the barrier manufacturer’s stated limit rather than a rule of thumb.
- Clean until the substrate is free of dust, grease and loose material. Vacuum and degrease. Primer bonds to the substrate, not to what is sitting on it.
- Repair cracks and fill joints, then let the repair cure and sand it flat.
- Prime for the substrate type. Absorbent surfaces such as plaster and plasterboard need different chemistry from non-absorbent surfaces such as tile and marble. This is where adhesion is won or lost.
Layer thickness is the constraint behind all five steps. Microcement is applied in very thin coats, so it is not a product you should rely on to correct an uneven substrate, so it corrects nothing. Follow the system’s own guideline for coat thickness and cure times rather than a number carried over from another product.
Best practices for applying fiberglass mesh in microcement projects
Embed the mesh into the wet base coat, not onto a cured one.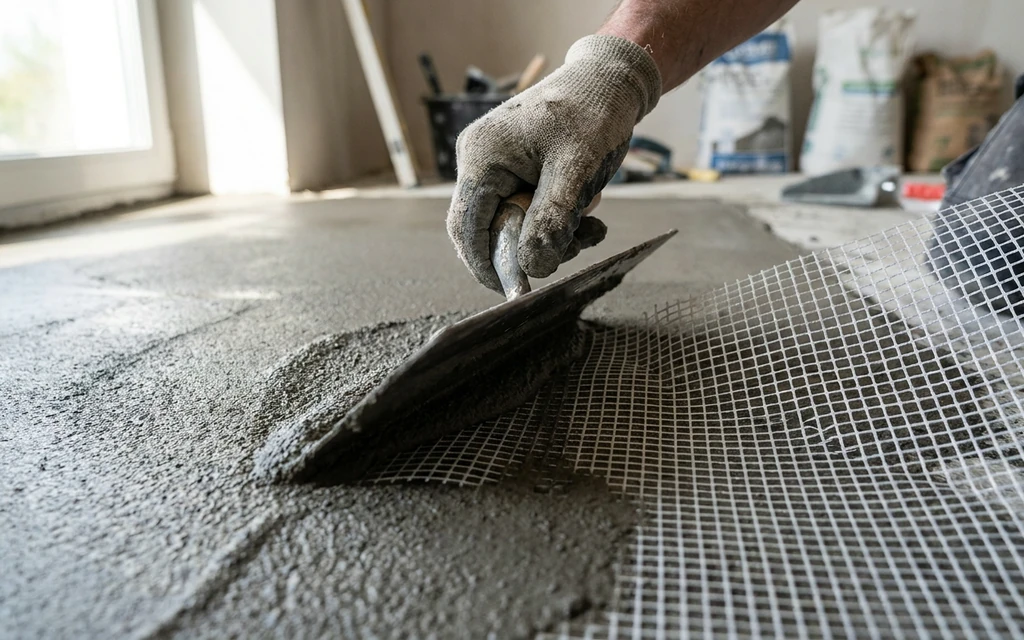
- Apply the primer specified for that substrate and allow it to dry as specified by the manufacturer.
- Apply the base layer and lay the mesh into it while it is still wet, working it flat with no wrinkles and no trapped air.
- Overlap seams according to the system manufacturer’s specification; where a measurement is not provided, a modest overlap is generally preferable to creating a thick ridge. Enough for continuity, not so much that you build a visible ridge.
- Keep coating until the mesh is fully buried and its pattern no longer reads through the surface.
- Seal the finished installation with the sealer specified for that system.
Four failures account for most callbacks, and every professional applicator has met all four: mesh laid onto a coat that has already skinned, so it never embeds; wrinkles flattened later into hard lines; overlaps stacked so wide the seam telegraphs as a raised band; and mesh stopped short at the wall junction, exactly where the movement is. The first three can compromise the reinforcement and, just as importantly, become visible in the finished surface, they change the appearance of the finished surface, and a telegraphed seam cannot be sanded out of a continuous floor.
Done correctly, none of this is visible. The mesh disappears into the base, and its only evidence is the crack that never arrives. That is the whole point of reinforcement: it does not prevent cracks in the coating, it prevents the substrate’s movement from becoming one.
Application workflow comparing microcement with and without mesh
| Escenario | Without mesh | With mesh |
| Substrate | must be rigid, sound, monolithic | can include tile, panels, repairs, transitions |
| Prep | clean, repair, level | clean, repair, level |
| Primer | matched to absorbency | matched to absorbency |
| Base | base coats, sand between | base coat, embed mesh wet, second coat to bury it |
| Acabado | finish coats, sand between | finish coats, sand between |
| Seal | sealer for the exposure | sealer for the exposure |
| Extra labor | none | one pass, plus material |
The extra cost is one additional pass and a roll of mesh. The cost of skipping it, when the substrate needed reinforcement, can be an entire field repair.
The one spec to check before you buy: alkali resistance
Cementitious base coats cure in a strongly alkaline environment. Ordinary E-glass degrades in that chemistry over time, so a mesh can look perfectly fine during installation while gradually losing performance if it is not designed for prolonged exposure to alkaline materials. Alkali-resistant glass is formulated with zirconia to survive it.
If a listing does not state alkali resistance, don’t assume the mesh is suitable for a cementitious system. Check the technical data or ask the manufacturer. It is the most common gap in mesh sold for plaster and overlay work, which is why our own roll leads with the property rather than the format: alkali-resistant fiberglass reinforcement mesh, 39 inches wide, 164 feet long, roughly 538 square feet per roll before overlaps.
One more distinction, because search results confuse them constantly: self-adhesive fiberglass drywall tape is a seam product. It is not a field reinforcement, it is usually not alkali resistant, and its adhesive is a bond breaker inside a cementitious build-up.
Where Terrazzo GraniTech Sits on This
We sell the mesh, and we will still tell you when you do not need it.
Our finishes are a granite and resin-based plaster built on patented anti-crack memory resin technology, so row one of that first table, the shrinkage and crazing that comes from the coating’s own cure, is engineered out at the formulation level. That is why the system installs directly over existing tile with no demolition, no hassle and no permits.
It does not, and cannot, engineer out row two. Nothing applied on top of a substrate controls what the substrate does. So we specify alkali-resistant reinforcement where the substrate calls for it, and we say plainly where it does not.
The material difference is covered in microcement versus microtopping, the full picture of why these surfaces crack is in microcement crack problems, and wet areas start with microtopping in the bathroom. The reinforcement, primers and membranes live in reinforcement, waterproofing and surface prep.
Frequently Asked Questions
Does microcement need mesh?
Not always. The deciding factor is the substrate, not the brand of microcement. Floors, stairs, work over existing tile, panel substrates and wet areas often call for reinforcement. Small vertical areas over a rigid, sound substrate can be done without it. The deciding factor is the substrate, not the brand of microcement.
Can microcement be applied over fiberglass mesh?
Yes, and the phrasing hides the detail that matters. The mesh is embedded into the first base coat while it is wet, then buried by the coats that follow. Mesh laid onto a cured surface with microcement applied over it is a weak plane inside the build-up, not reinforcement.
Can you apply microcement over tile without mesh?
You can, and it is the most likely way to end up with grout lines telegraphing through the finish. The tile is rigid, jointed and non-absorbent. If the system calls for reinforcement over tile, use a compatible bonding primer and full-field mesh.
Are there alternatives to using mesh for microcement?
For substrate movement, not really. The alternatives solve different problems: a crack-isolation membrane handles a moving substrate under tile, structural repair handles a live crack, and a lower-shrinkage formulation handles crazing in the coating. Some ready-to-use microcements are marketed as needing no mesh, and on a small rigid dry wall that holds. It does not extend to floors, tile or panels.
What is the best substrate for microcement?
A rigid, sound, dry and dimensionally stable one. Power-floated concrete and cement screed are easiest, cement board is reliable, existing tile is workable with the right primer and full-field mesh, and timber panels are hardest because they move most.
What happens if you skip the mesh when you needed it?
Nothing, for a while. Reflective cracking is a delayed failure. The substrate moves seasonally or under load and the line appears weeks or months after handover, usually along a grout line, a panel joint or a substrate change.
How much mesh do you need?
Take the field area, then add for overlaps and waste. Seams overlap about 2 inches, and corners and transitions need banded material on top of the field. A 39 inch by 164 foot roll covers roughly 538 square feet before overlaps, so on a cut-up floor plan for meaningfully less usable coverage than the roll figure.
 Spanish
  English
  German